How to Properly Use and Maintain the Warming Rack on Your Grill
Picture this: it’s a lovely summer evening, and you’ve decided to fire up the grill for a delicious barbecue. As you get ready to cook up mouthwatering dishes, you notice that your grill is equipped with a warming rack. But wait, do you actually know how to use and maintain this handy feature properly? If not, don’t worry! In this blog post, we’ll guide you through the ins and outs of using and maintaining the warming rack on your grill. Whether you’re a seasoned grill master or just starting out, we’ve got you covered. Get ready to uncover the secrets to properly using and prolonging the life of your warming rack, ensuring that your grilled creations stay warm and ready to enjoy. Let’s dive in!
Top Picks for Grills with Warming Racks
What is a warming rack on a grill?
When it comes to grilling, every seasoned barbecue enthusiast knows that timing is crucial. Having the ability to keep your food warm after it’s cooked without overcooking it can be a game-changer. That’s where the warming rack comes in. In this blog post, we will explore what a warming rack is, its purpose, and how it can enhance your grilling experience.
Introducing the Warming Rack
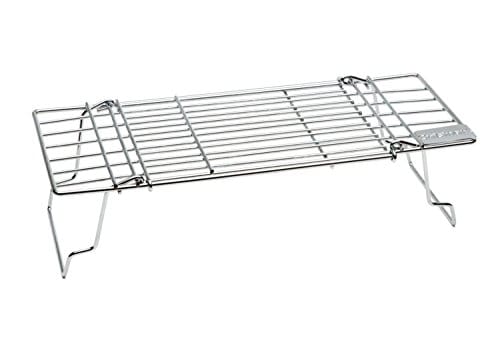
A warming rack is an additional rack located above the main cooking grates on a grill. It provides an elevated platform for you to keep your cooked food warm while you work on other items or prepare to serve a delicious meal. Unlike the cooking grates, the warming rack is not directly exposed to the heat source, allowing it to keep your food at an ideal temperature without continuing the cooking process.
Purpose and Benefits
The primary purpose of the warming rack is to keep cooked food warm until you’re ready to serve it. By utilizing this additional rack, you can ensure that your grilled creations are served hot and fresh, boosting both the flavor and overall dining experience. Here are some of the key benefits of having a warming rack on your grill:
- Prevents Overcooking: The warming rack keeps your cooked food warm without subjecting it to direct heat, preventing it from getting overcooked or drying out.
- Optimal Temperature: The position of the warming rack allows it to benefit from the residual heat within the grill, maintaining a consistent and ideal temperature for your food.
- Serves as a Holding Area: The warming rack provides a designated space to keep cooked items while you continue grilling other foods. This makes it convenient for multitasking and ensures that everything is served at the same time.
- Versatility: Apart from keeping food warm, the warming rack can also serve other purposes. It can be used to toast buns, melt cheese on top of burgers, or even cook delicate and smaller food items that might fall through the main grates.
Types of Warming Racks
There are a few different types of warming racks available, each with its own unique features and benefits. Let’s take a closer look at the most common types:
- Fixed Warming Racks: This type of warming rack is attached to the grill and cannot be adjusted or removed. While it offers a convenient and permanent warming surface, it may limit the storage space or overall flexibility of the grill.
- Swing-Away Warming Racks: These warming racks are attached to the back of the grill and can be swung away when not in use. They are adjustable, allowing you to move them closer or further from the heat source as needed.
- Removable Warming Racks: Removable warming racks offer high flexibility as they can be easily attached or detached from the grill. They are often compatible with different models, making them an excellent choice for those who want adaptability.
Proper use of the warming rack
Introduction
The warming rack is a valuable component of your grill that can help you keep food warm while you finish preparing other items or gather everyone for a meal. It is often located above the main cooking area and is a handy feature for ensuring your dishes are served at the perfect temperature. In this blog section, we will discuss how to properly use the warming rack, including essential tips for placement, heat settings, and ideal timing.
Placing Cooked Food on the Rack: A Step-by-Step Guide
Placing cooked food on the warming rack may seem straightforward, but following a few important steps will ensure optimal results. Here’s how to do it right:
- Choose the Right Container: When placing food on the warming rack, it is best to use oven-safe containers or foil trays. This will help retain heat and prevent any drippings from falling onto the main cooking area.
- Separate Foods: If you have different types of food, make sure to separate them on the warming rack. This will prevent any flavors from mingling and help maintain the individual tastes and textures of each dish.
- Cover with Aluminum Foil: To further seal in the heat, lightly cover the containers or trays with aluminum foil. This will ensure that your food stays warm, moist, and delicious until it’s time to serve.
- Avoid Crowding: To allow air to circulate properly, avoid overcrowding the warming rack. Leave enough space between containers for heat to flow evenly around the food.
Adjusting Heat Settings: Finding the Sweet Spot
To make the most of your warming rack, it’s crucial to understand how to adjust the heat settings and maintain the ideal temperature. Here are a few tips to help you find that sweet spot:
- Preheat the Grill: Before placing any food on the warming rack, preheat your grill to a medium-low or low temperature, depending on the desired warmth. This will ensure consistent heating and prevent any sudden temperature fluctuations.
- Monitor the Main Cooking Area: Keep an eye on the main cooking area and adjust the heat accordingly. You want the warming rack to maintain a slightly lower temperature, but not too cool that your food loses its warmth.
- Use the Burner Controls: If your grill has multiple burners, adjust the flame levels accordingly. Lower the heat on the burner beneath the warming rack while keeping the others at the desired cooking temperature.
Understanding Ideal Timing: When to Place Food on the Warming Rack
Timing is everything when it comes to using the warming rack effectively. Understanding when to place food on the rack will help you ensure that all your dishes are served piping hot. Here’s a handy guide:
- Keep Side Dishes Warm: If you are grilling meats or other main dishes, start using the warming rack at least 10-15 minutes before the primary cooking is complete. This allows you to keep side dishes, such as vegetables or rolls, warm until everything is ready to serve.
- Save Space: For larger meals or gatherings, you may need to use the warming rack to free up space on the main cooking area. In this case, place foods that are already cooked and need to be kept warm while others are still grilling.
- Timing Flexibility: Remember that the warming rack is a flexible tool that can help you manage the timing of your dishes. If your main course requires more time on the grill, feel free to use the warming rack to hold appetizers or desserts until the main course is ready.
Conclusion
Using the warming rack on your grill is a fantastic way to ensure that your food stays warm and delicious until it’s time to eat. By following these tips on proper placement, adjusting heat settings, and understanding ideal timing, you’ll be able to make the most out of this convenient feature. So, fire up your grill, get cooking, and enjoy perfectly warm dishes every time!
Maintenance and cleaning of the warming rack
: Keeping Your Warming Rack in Top Shape
When it comes to grilling, a well-maintained warming rack is crucial for achieving perfectly cooked meals. It’s easy to overlook the importance of cleaning and maintaining this often neglected part of your grill, but doing so will not only improve the longevity of the rack but also enhance the flavor of your food. In this blog post, we will discuss the significance of regular maintenance and cleaning of the warming rack, providing instructions on how to effectively clean and remove any grease or residue that may accumulate over time.
Importance of Regular Maintenance
Regular maintenance and cleaning of the warming rack is essential for several reasons:
- Hygiene: As you grill various foods, grease and food particles can quickly accumulate on the warming rack. Neglecting to clean it regularly can lead to the growth of bacteria and mold, posing a health risk.
- Even Heat Distribution: A dirty warming rack can disrupt the even distribution of heat, resulting in uneven cooking. Cleaning the rack ensures that heat is evenly dispersed, allowing your food to cook thoroughly.
- Longevity: By properly maintaining and cleaning your warming rack, you can significantly extend its lifespan. Regular maintenance will prevent rust, corrosion, and other forms of damage, preserving the quality of the rack.
Cleaning Instructions
To effectively clean and remove grease or residue from your warming rack, follow these simple steps:
- Preparation: Ensure that your grill is turned off and has cooled down to a safe temperature before cleaning.
- Remove the Rack: If possible, detach the warming rack from the grill for ease of cleaning. Take note of any screws or clips that may need to be removed before lifting the rack out.
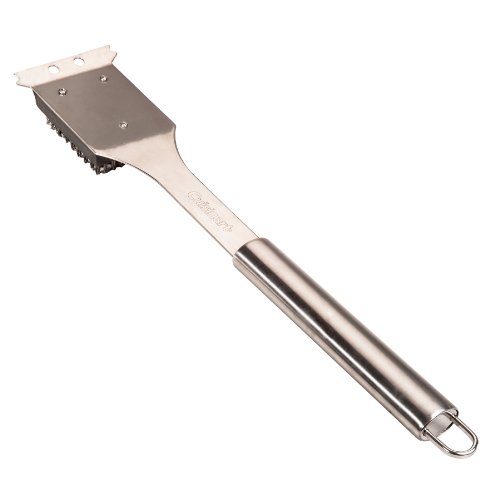
- Scraping: Use a grill brush or a plastic scraper to remove any larger food particles or debris from the surface of the rack. Be careful not to scratch the rack, especially if it is coated with a non-stick material.
- Soak in Warm, Soapy Water: Fill a basin or sink with warm water and mild dish soap. Place the warming rack in the soapy solution and allow it to soak for 15-20 minutes. This will help loosen any grease or residue that may have stuck to the rack.
- Scrubbing: After soaking, use a nylon brush or sponge to scrub the warming rack thoroughly. Pay close attention to any remaining grease or residue. For stubborn stains, you can use a grill cleaner or a mixture of baking soda and water as a natural alternative.
- Rinse and Dry: Once the warm, soapy water has done its job, rinse the warming rack under clean water to remove any soap residue. Pat it dry with a clean towel or let it air dry completely before reinstalling.
- Reinstall the Rack: Carefully position the cleaned warming rack back into its original place on the grill. Ensure that it is securely fastened with the appropriate screws or clips.
Tips and Tricks
- Clean your warming rack after each grilling session to prevent grease and residue from accumulating.
- Avoid using abrasive cleaners or metal brushes, as these can damage the surface of the rack.
- If your warming rack is dishwasher-safe, you can place it in the dishwasher for cleaning, following the manufacturer’s instructions.
- Regularly inspect the rack for signs of wear and tear. Replace it if necessary to maintain optimal performance.
By following these maintenance and cleaning tips, you can ensure that your warming rack remains in excellent condition, allowing you to grill delicious meals with ease. Remember, a well-maintained warming rack is not only a hygiene essential but also a key factor in achieving consistent and flavorful results. Happy grilling!
Key considerations for effectively using and caring for your grill’s warming rack
In conclusion, the warming rack on your grill is a valuable tool that can greatly enhance your grilling experience. By following a few simple steps, you can effectively use and maintain it to ensure optimal results and safe food preparation.
Throughout this post, we’ve discussed the main factors to consider when using the warming rack, such as its purpose, temperature regulations, and placement. Additionally, we have highlighted the importance of keeping the rack clean and properly maintaining it to avoid any potential issues.
To maximize the benefits of the warming rack, we recommend taking the time to understand your specific grill model and its instructions. This will help you determine the ideal temperature settings for different types of food, as well as the appropriate placement for optimal warming.
Remember, using and maintaining the warming rack correctly is not only crucial for great taste and flavor, but also for ensuring food safety. By following these guidelines, you can create delicious, perfectly heated dishes for you and your guests to enjoy.
So, go ahead and make the most of your warming rack. Happy grilling!
